Battle Aces – Basic Guide
Basic Guide for Beginners
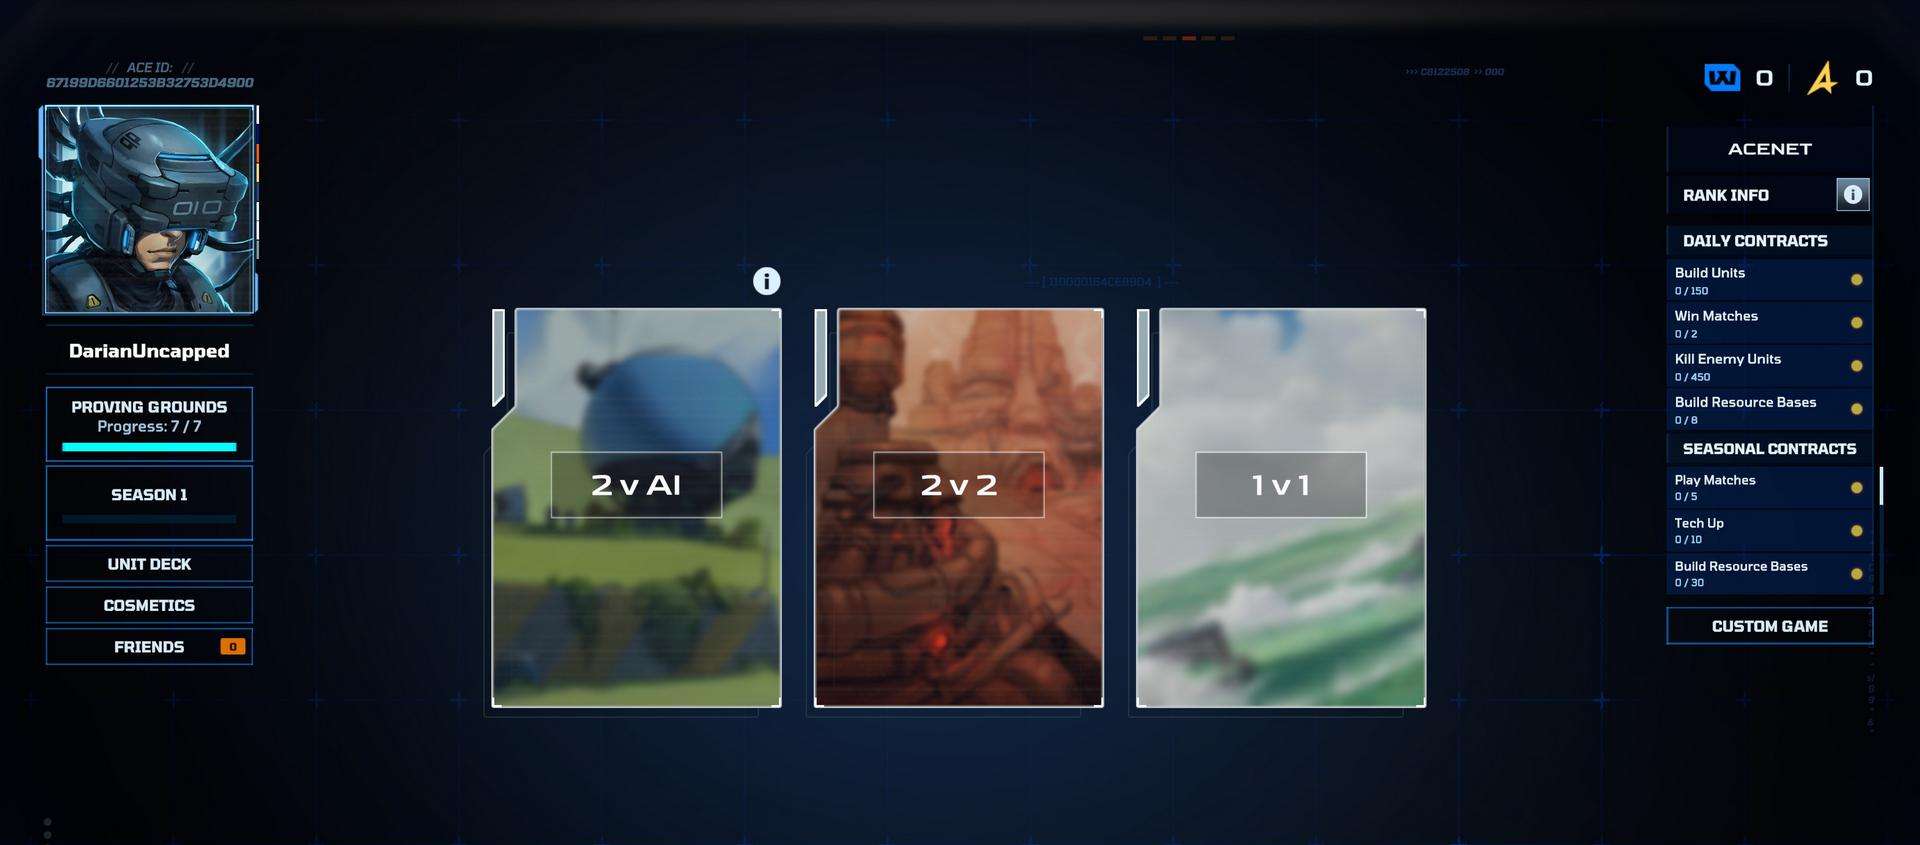
Game Modes
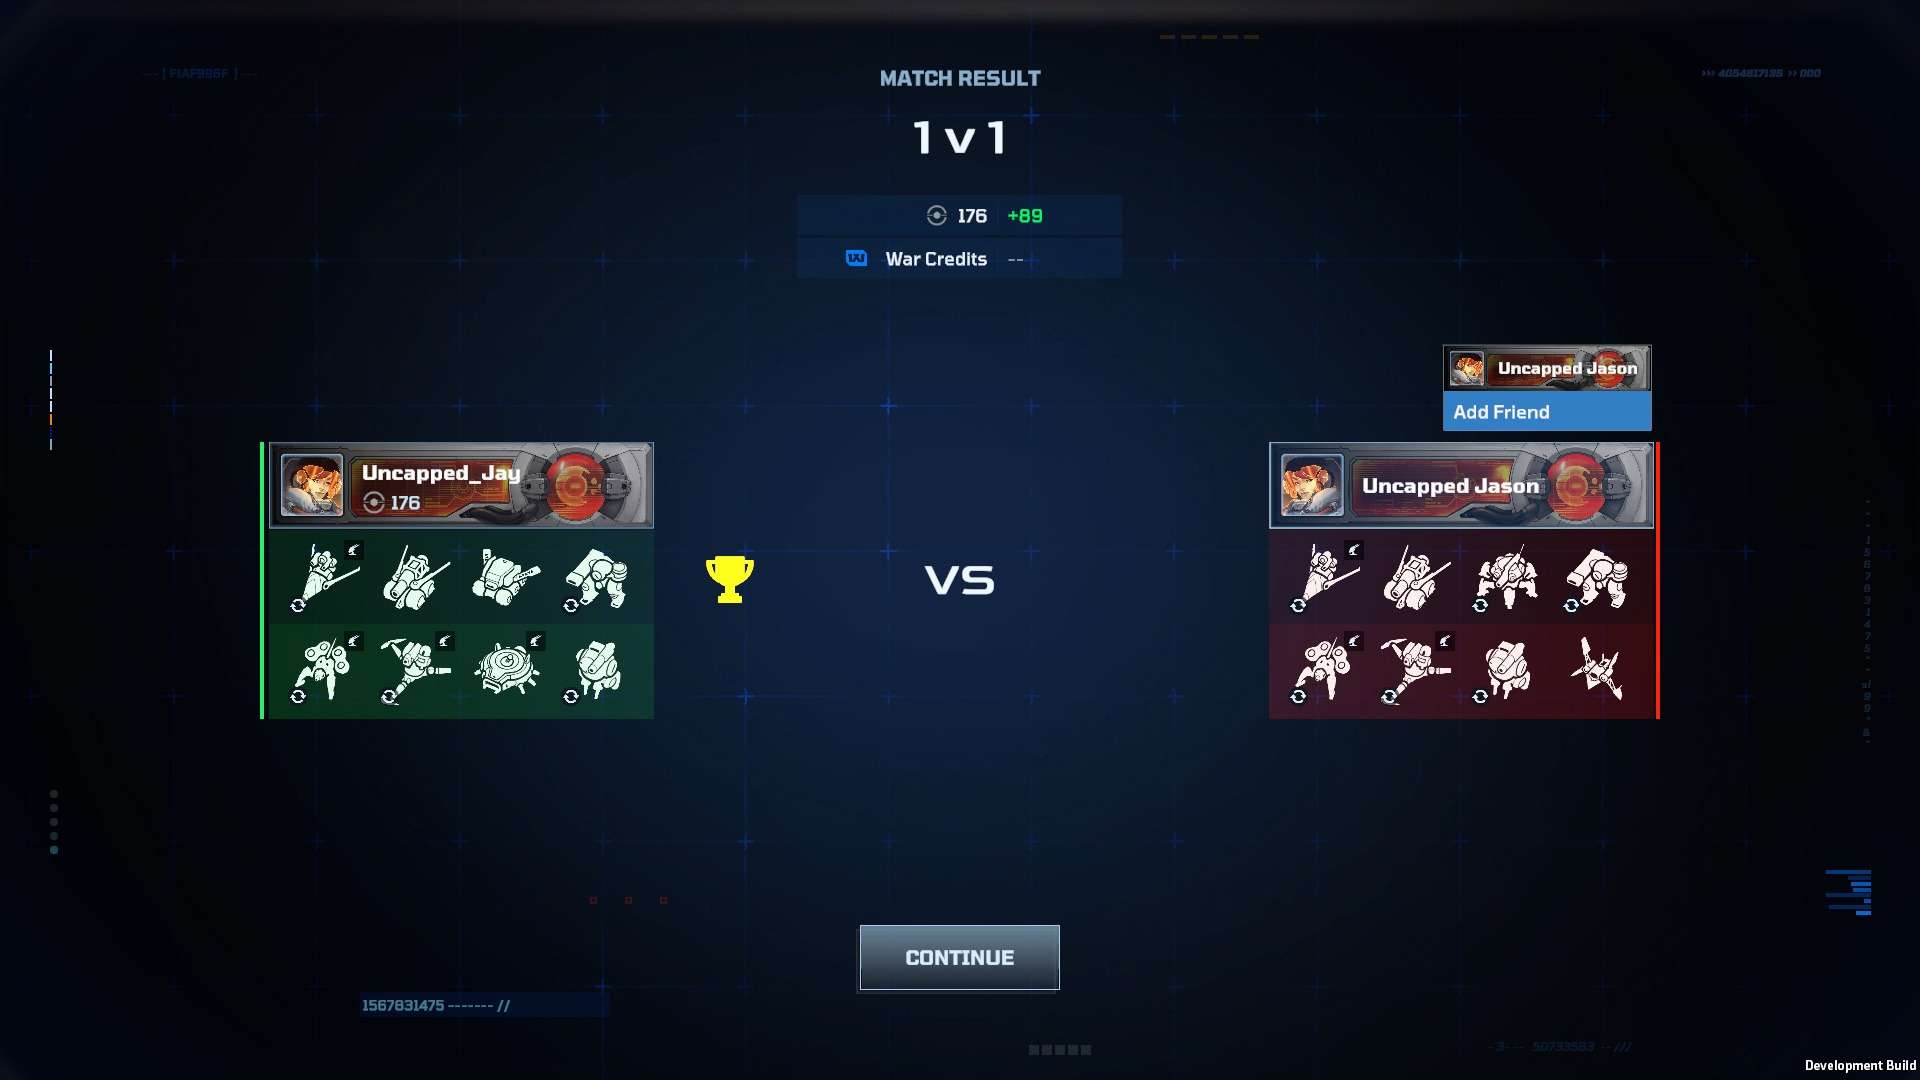
1v1
Play a match with another user to see who can defeat the opponent’s core first! This option is unlocked after completing the Proving Grounds.
In the post-match screen, you can add your opponent to your Friends List by clicking their User Profile to “Add Friend.”
Try Deck v AI
Play a practice match with an easy bot player to try out a new deck without worrying about affecting your rating. This is available in the Unit Deck Menu and can be accessed anytime.

2v2
Play a match with a teammate against another team of 2 to see which team can clinch a win! You can pair up with a specific friend or allow matchmaking to automatically pair you with another player. This option is unlocked after completing the Proving Grounds.

2vAI
Play a match with another player against an AI team to see who can secure a victory! You can pair up with a specific friend or allow matchmaking to automatically pair you with another player. AI difficulty is based off of you and your teammate’s rating. This option is unlocked after completing the Proving Grounds.

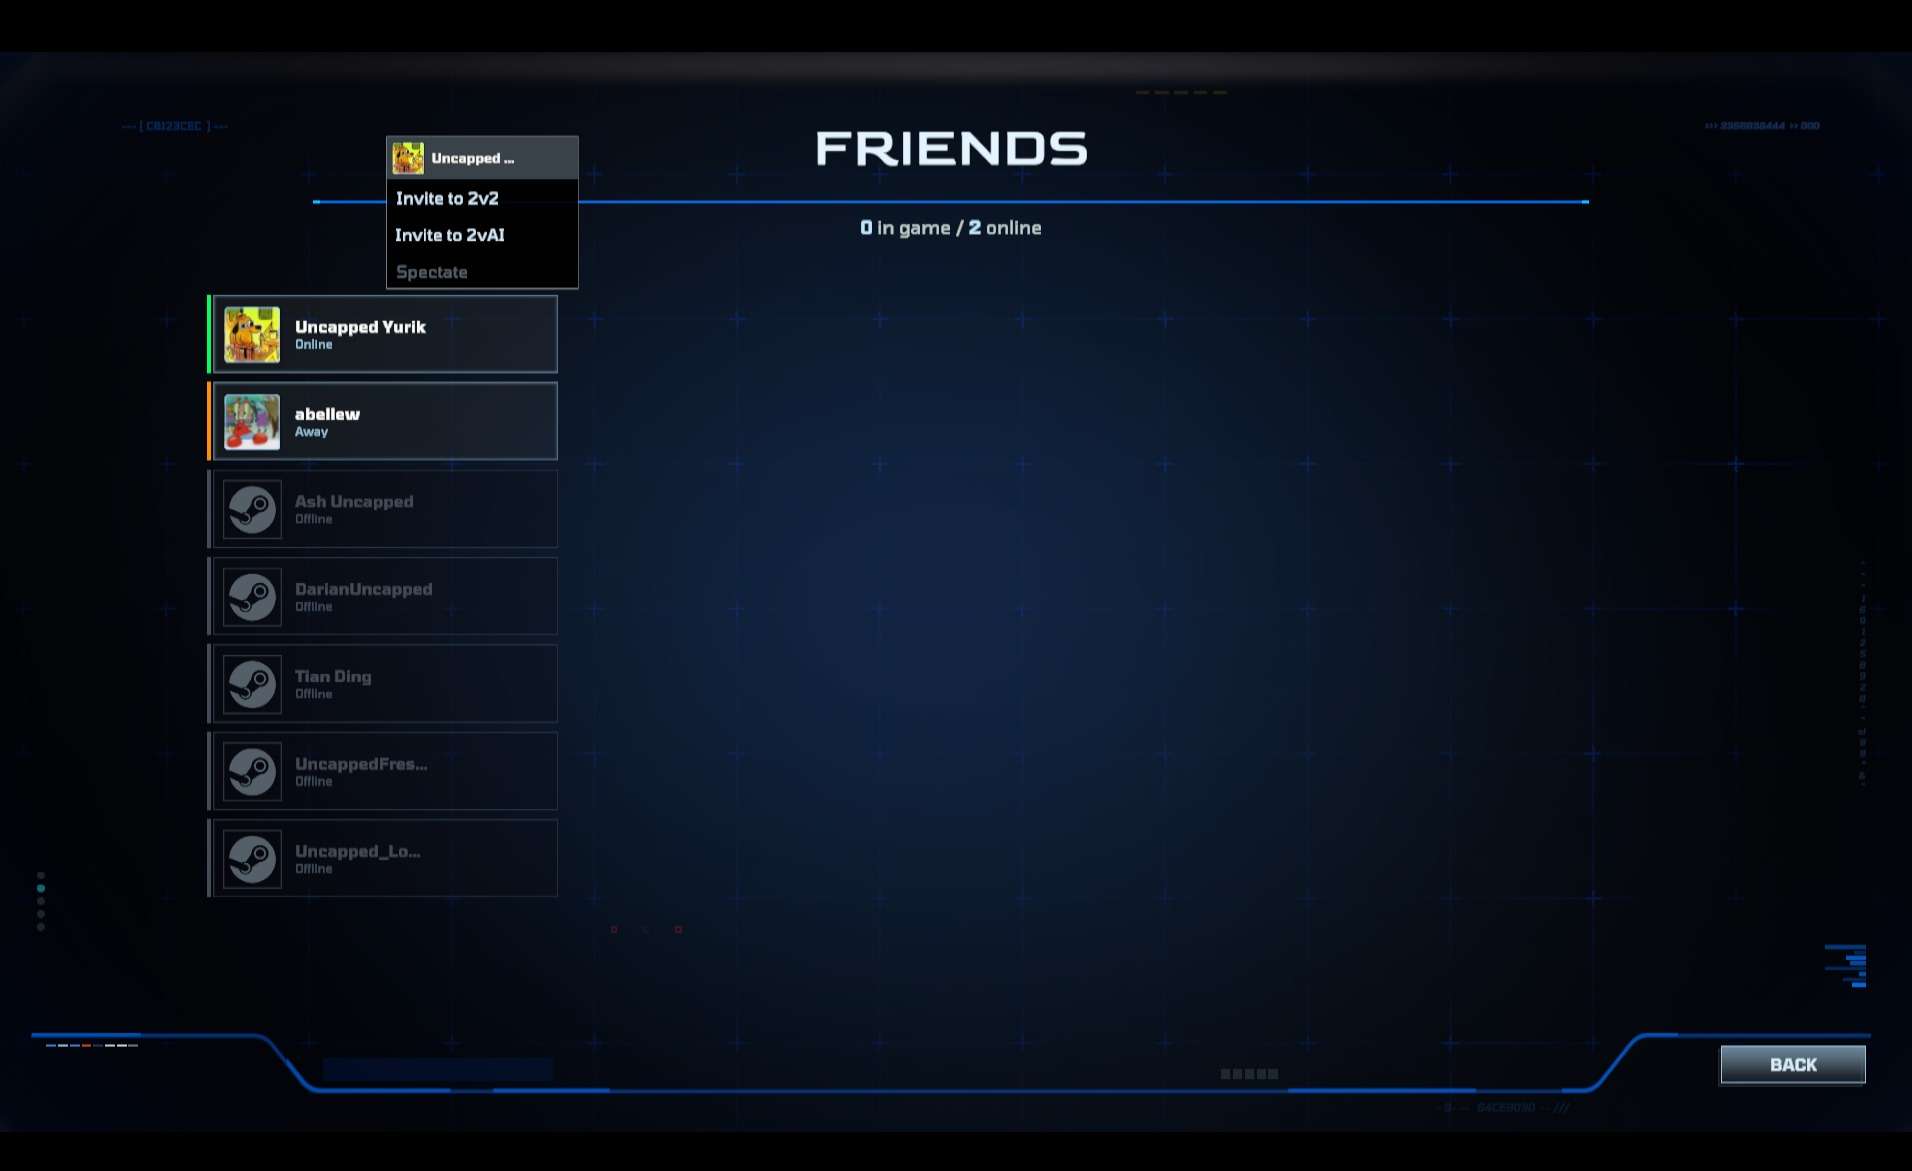
Invite to 2v2 or 2vAI
Play a Ranked 2v2 match or 2vAI match with a friend using the invite feature. Go to the Friends List and click on the User Profile to Invite to 2v2 or Invite to 2vAI. This option is unlocked after completing the Proving Grounds.
Unit Deck Selection
- Save Deck – Save up to 3 preset decks of your choosing that can be quickly loaded between matches.
- Load **Deck – Load your previously saved Decks. – Core Units **– Pick 2 units that you can build as soon as you enter a match.
- Units Available: Beetle, Blink, Blink Hunter, Crab, Crossbow, Gunbot, Hornet, Hunter, Knight, Missilebot, Recall, Recall Hunter, Scorpion, and Wasp
- Foundry Units – Pick a Foundry unit that is available when you tech to Foundry
- Units Available: Ballista, Bomber, Crusader, Destroyer, Heavy Hunter, King Crab, Mortar, Raider, Recall Shocker, Shocker, Swift Shocker, and Turret
- Advanced Foundry Units – Pick an Advanced Foundry unit that is available when you tech to Advanced Foundry.
- Units Available: Advanced Blink, Advancedbot, Assaultbot, Behemoth, Gargantua, Heavy Ballista, and Sniper
- Starforge Units – Pick a Starforge unit that is available when you tech to Starforge
- Units Available: Advanced Recall, Airship, Butterfly, Dragonfly, Falcon, Flak Turret, Mammoth, and Stinger
- Advanced Starforge Units – Pick an Advanced Starforge unit that is available when you tech to Advanced Starforge
- Units Available: Advanced Destroyer, Artillery, Bulwark, Katbus, Kraken, Locust, Predator, and Valkyrie
- Any Foundry Slot – An additional wildcard slot that can be used to bring in another unit either from the Foundry or Advanced Foundry.
- Any Starforge Slot – An additional wildcard slot that can be used to bring in another unit either from the Starforge or Advanced Starforge.
- Abilities – Some units have additional abilities that can be used in combat. This information is provided in the Unit Deck Selection menu.
- Blink – Teleports a short distance towards a target location.
- Overclock – Temporarily increases movement and attack speed.
- Recall – Teleport to your nearest specified base.
- Setup – Unit becomes immobile and can attack.
- Destruct – Destroy the unit to free up Bandwidth. (Turret Exclusive)
- Free Rotation Units – Each week a new set of units will be unlocked for a limited time so that you can try them out before buying them with War Credits or Ace Points. – – – Each week the user will temporarily be granted access to the following units on top of their already unlocked units:
- 2 Core Units
- 1 Foundry Unit
- 1 Advanced Foundry Unit
- 1 Starforge Unit
- 1 Advanced Starforge Unit
Currency and Unit Purchasing
- War Credits – Earned in-game currency used to purchase new units.
- War Credits are gained throughout different levels of the Warpath and for completing certain Daily Contracts.
- Ace Points – Gifted in-game currency to purchase new units.
- Ace Points will be granted throughout the Closed Beta Test as rewards to the player.
- Unit Purchasing – Open the Unit Deck and select any locked or free rotation unit to spend your War Credits or Ace Points and permanently unlock the unit.
Warpath and XP
- Warpath – A Battlepass containing 22 levels and a variety of rewards. Rewards include:
- War Credits
- Cosmetics
- Units
- XP – Earned experience to progress through the Warpath:
- XP is gained from playing 1v1 and 2v2 matches, as well as from completing Daily/Seasonal Contracts. XP will be granted as long as the match is completed; this means that even if you lose, XP can still be gained!
- XP will also be earned, at a reduced rate, when playing 2vAI matches with a friend.
- XP will not be gained when spectating a match, playing Try Deck v AI, and from playing custom matches with friends.
Daily and Seasonal Contracts
Daily Contracts
4 Contracts are granted daily. Complete the objectives to unlock XP rewards. Some even grant War Credits! Progress is only gained in 1v1, 2v2, or 2vAI matches.
Seasonal Contracts
5 Contracts are granted weekly. Complete the objectives for large XP rewards. Progress is only gained in 1v1, 2v2, or 2vAI matches.
Cosmetics
- Cosmetics Menu – Contains a variety of options to personalize your gameplay experience!
- Core Skin –Only 1 Core Skin is available by default and 2 can be unlocked through the Warpath.
- Resource Base Skin – Only 1 Resource Base Skin is available during the Beta period.
- Worker Skin – Only 1 Worker Skin is available during the Beta period.
- Fatality – Only 1 Fatality is available during the Beta period and 1 will be available at a later date.
- Army Paint – 6 Army Paints are immediately available and 1 will be available at a later date.
- Avatar – 6 Avatars are immediately available and 1 can be unlocked through the Warpath.
- Banner – 4 Banners are immediately available and 3 can be unlocked through the Warpath.
- Emotes – 8 Emotes are immediately available and 3 can be unlocked through the Warpath.
- Spray – 3 Sprays are immediately available and 2 can be unlocked through the Warpath.
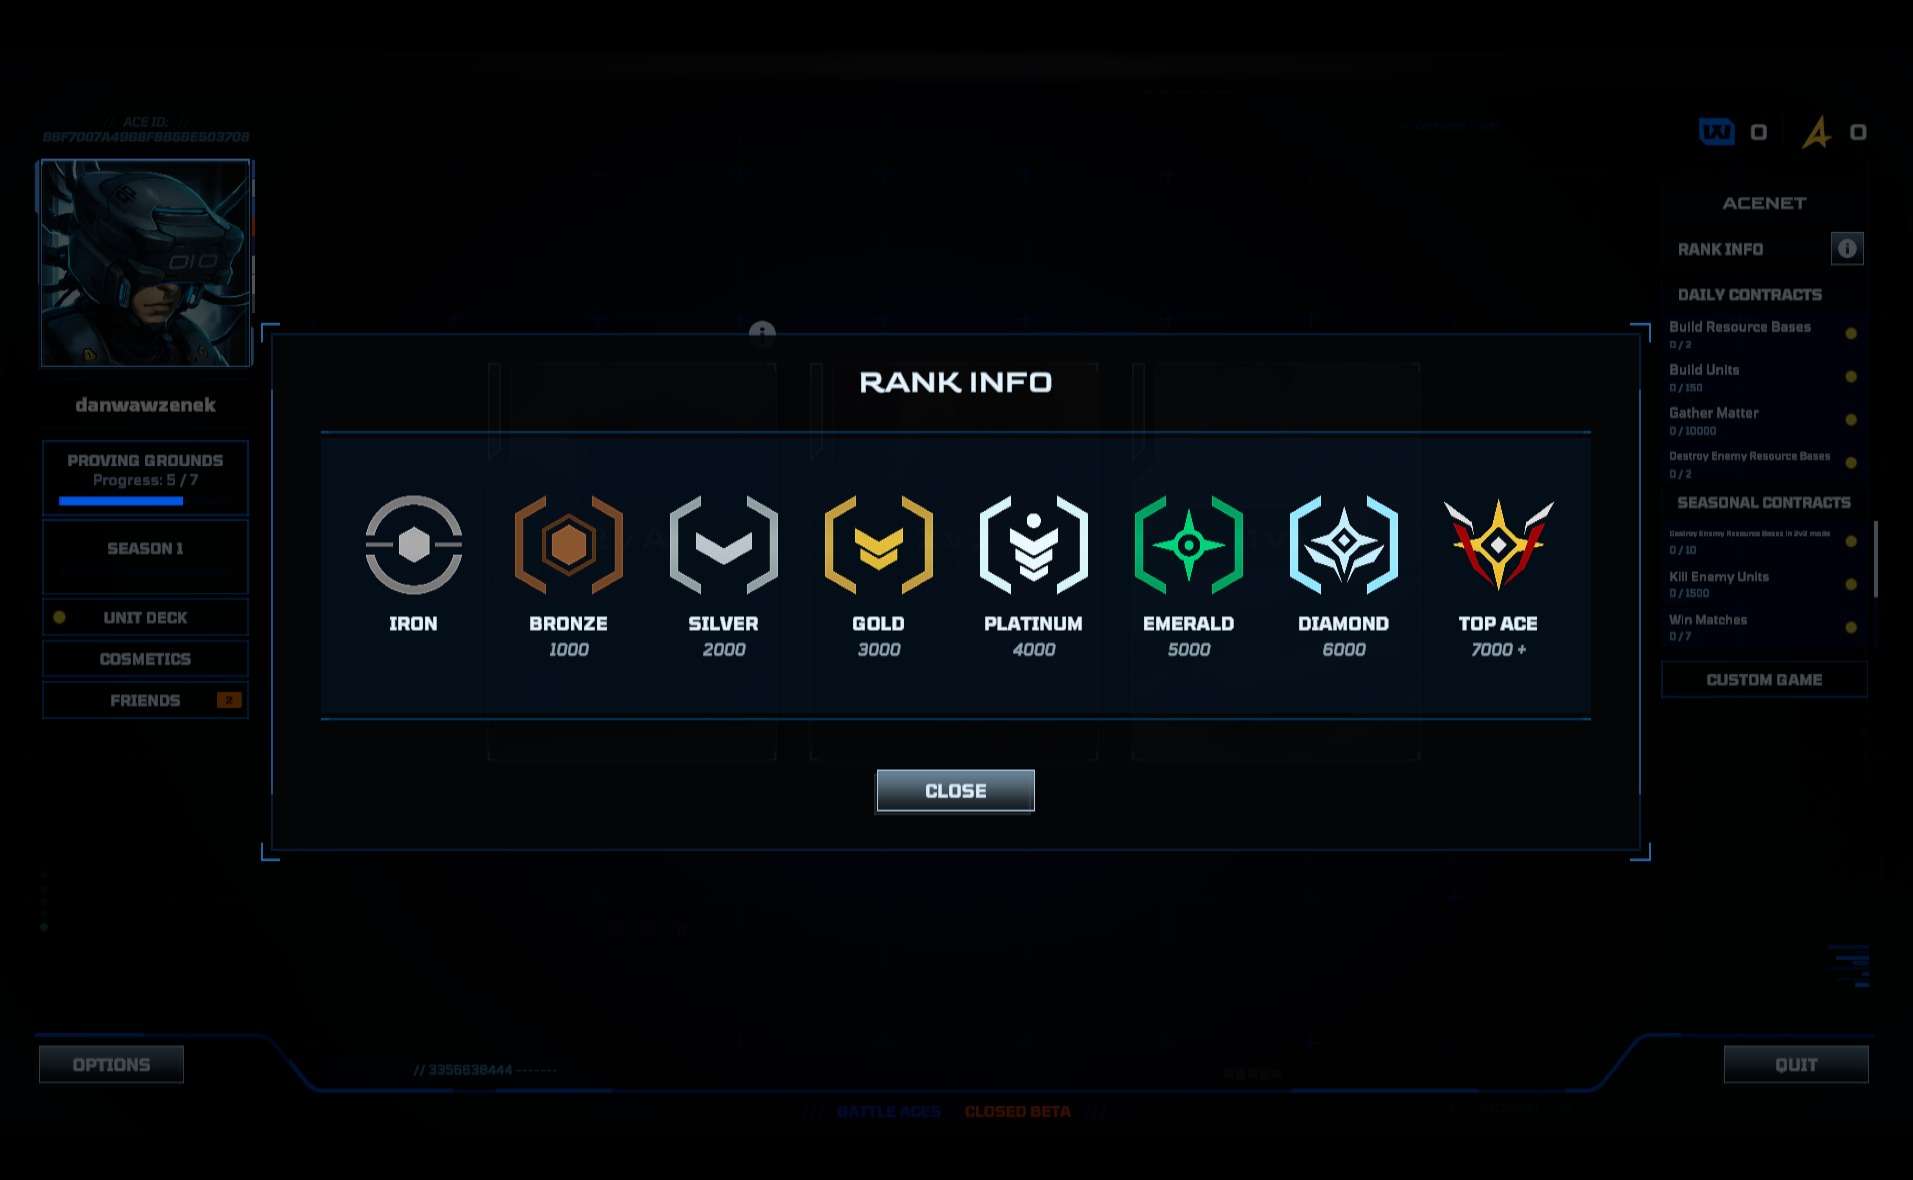
Rating and Rank
Rating
Your rating is determined by your wins and losses across throughout games played (excluding Proving Grounds and Custom Matches). 1v1 and 2v2 ratings are calculated separately and are specific to each game mode. Losing matches will not cause your rating to decrease until you exceed a rating of 2000. Once you exceed 2000, losing matches will result in a decrease of your rating, but it will never fall below your current Rank.
Rank
There are a total of 8 ranks that are determined by your rating. Once you move up a rank, you will retain that rank, regardless of your wins/losses in future matches. All players will start at Iron Rank for 1v1 and 2v2.
- Iron Rank – Rating of 0 to 999
- Bronze Rank – Rating of 1000 to 1999
- Silver Rank – Rating of 2000 to 2999
- Gold Rank – Rating of 3000 to 3999
- Platinum Rank – Rating of 4000 to 4999
- Emerald Rank – Rating of 5000 to 5999
- Diamond Rank – Rating of 6000 to 6999
- Top Ace Rank – Rating of 7000+
Gameplay
Bandwidth
Each unit has a bandwidth cost to call them into the battlefield. All players will have a bandwidth limit of 200 that restricts the number of units that can be in play at one time, but this cost will be refunded anytime a unit is killed in combat. More powerful units will have a higher bandwidth requirement.
Resources
Collect 2 different resource types: Matter (Red) and Energy (Blue) in order to build more units and create new Resource Bases.
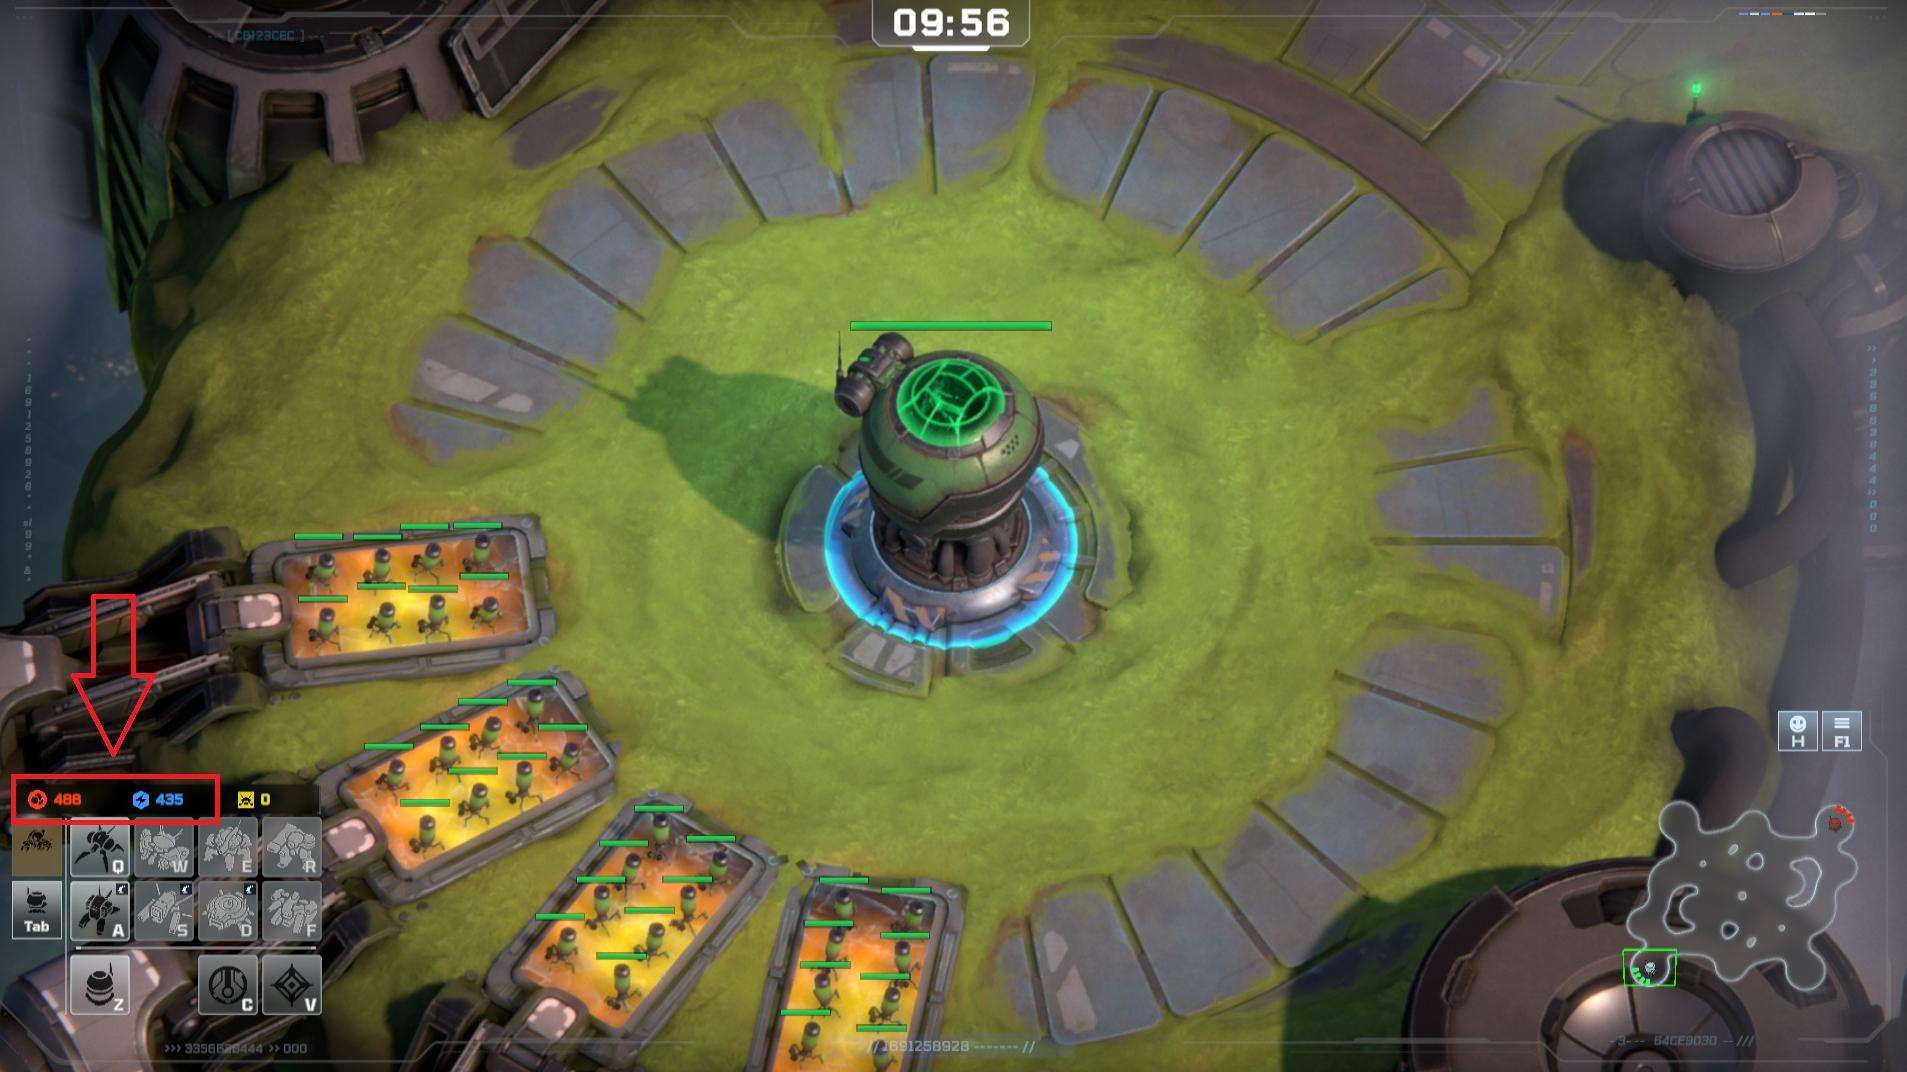
Resource Base
Building Resource Bases will allow you to gain more resources over time. A max of 4 additional Resource Bases can be generated. If damaged, they will restore health over time; if destroyed, they can be rebuilt for a cost.
Workers
Workers will automatically spawn around the core (HQ) and any Resource Base that is built. If damaged, they will regenerate health over time; if destroyed, they will respawn after a short cooldown.
Air vs Ground
- Air Units – Units are able to fly over every obstacle on the map. All flying units can attack ground units, but not all flying units can attack other air units. All air units can also fully attack while moving.
- Ground Units – Units are bound by the confines of the map and obstacles. All ground units can attack other ground units (except for the Flak Turret), and some are also able to attack flying units too.
- Anti-Air Units – Anti-Air units can attack both ground and flying units (some are more effective on one type than the other). Look for the anti-air icon to see which units can defend against flying units.
Minimap
Located in the lower right part of the screen, the minimap shows you the entire map as well as unit positions (including the positions of any enemies in your visible range.) You can issue commands directly on the minimap and also use it to quickly move your camera to a location.
Fog of War
When you start a new match, most of the battlefield will be covered by the fog of war. Building new Resource Bases and spreading out your units are some of the ways you can expand your vision.
Commands
- Rally Point – In Build Menu, set a rally point by clicking the Right Mouse Button on any spot on the map and all newly created units will automatically move to that spot without having to issue an additional move command.
- Attack – After selecting a unit or army, press the ‘A’ key to enter attack mode and press the Left Mouse Button on a location for your units to focus on. Units will move to this location and attack any enemies (or buildings) within a set radius.
- Direct Attack – After selecting a unit or army, press the Right Mouse Button on another unit or a building to attack it directly. Units will focus solely on attacking the target and will ignore all other enemies until their target is destroyed.
- Move – After selecting a unit or army, press the Right Mouse Button on any location in the map to move your units to that spot.
- Hold Position – The ‘S’ key can be used to stop your unit in its tracks and hold defend a specific position. Units that hold position will defend their location but will not chase enemy units even when being attacked.
- Queued Commands – Hold down the Shift key when issuing move or attack commands to queue multiple movement points for your units to follow.
- Select All Army – The ‘~’ key can be pressed to select all your units anywhere on the map.
- Control Groups – A total of 4 control groups can be created to subdivide your army into smaller groups. After highlighting all of the units you want to add to a group, press Control + 1/2/3/4 to set that group to a hotkey. Then press the corresponding key to quickly select that group of units.
Ping
2v2 Only. Ping a spot on the map to show an area of interest to your teammate. Press the ‘G’ key to ping the map.
- Double-Click – If a unit is double clicked, all units of the same kind currently on screen will be automatically selected.
- Drag Select – Hold the Left Mouse Button to create a drag selection tool to select multiple units of different types.
- Select Core (Build Menu) – Press the Tab key to automatically switch focus to the HQ and enter build mode.
- Emotes – A total of 4 emotes can be equipped at a time and used during gameplay. Pick Emotes in the Cosmetics menu and use them in-game with the F5/F6/F7/F8 Keys.
- Sprays – Tag the battlefield with Sprays during gameplay. Open the Spray Preview with the ‘J’ key and place it by clicking the Left Mouse Button.
- Intelligence Bar – Press and hold the Spacebar key during a match to pull up information about what units your opponent has in their deck and see their current tech progress.

Options
- Graphics – Graphics Settings that control the look and performance of the game.
- Dynamic Resolution Scaling – Defaults to 90% – 100%. This setting will dynamically lower the resolution to 90% and upscale back to the selected resolution to try to achieve the maximum framerate supported by the monitor’s refresh rate (when V-Sync is enabled). If V-Sync is disabled, the game will default to the 90% resolution scaling in order to achieve the highest framerate possible.
- Audio – Audio Settings that control the volume of VO/SFX/Music. Also allows for Speaker Configurations to be changed.
- Gameplay – Gameplay settings for both in-game and menu controls
- Mouse Sensitivity, Camera Scroll Speed, Mouse Cursor Size, and Invert Mouse Drag Scroll.
- Enable Focus Fire – Defaults to off. This setting is for advanced players who prefer to directly attack a single target; their units ignore all other enemy attacks until the focus fire target is destroyed. If the player’s army is moving towards the focused target when it is destroyed, the army will stop moving until a new command is issued.
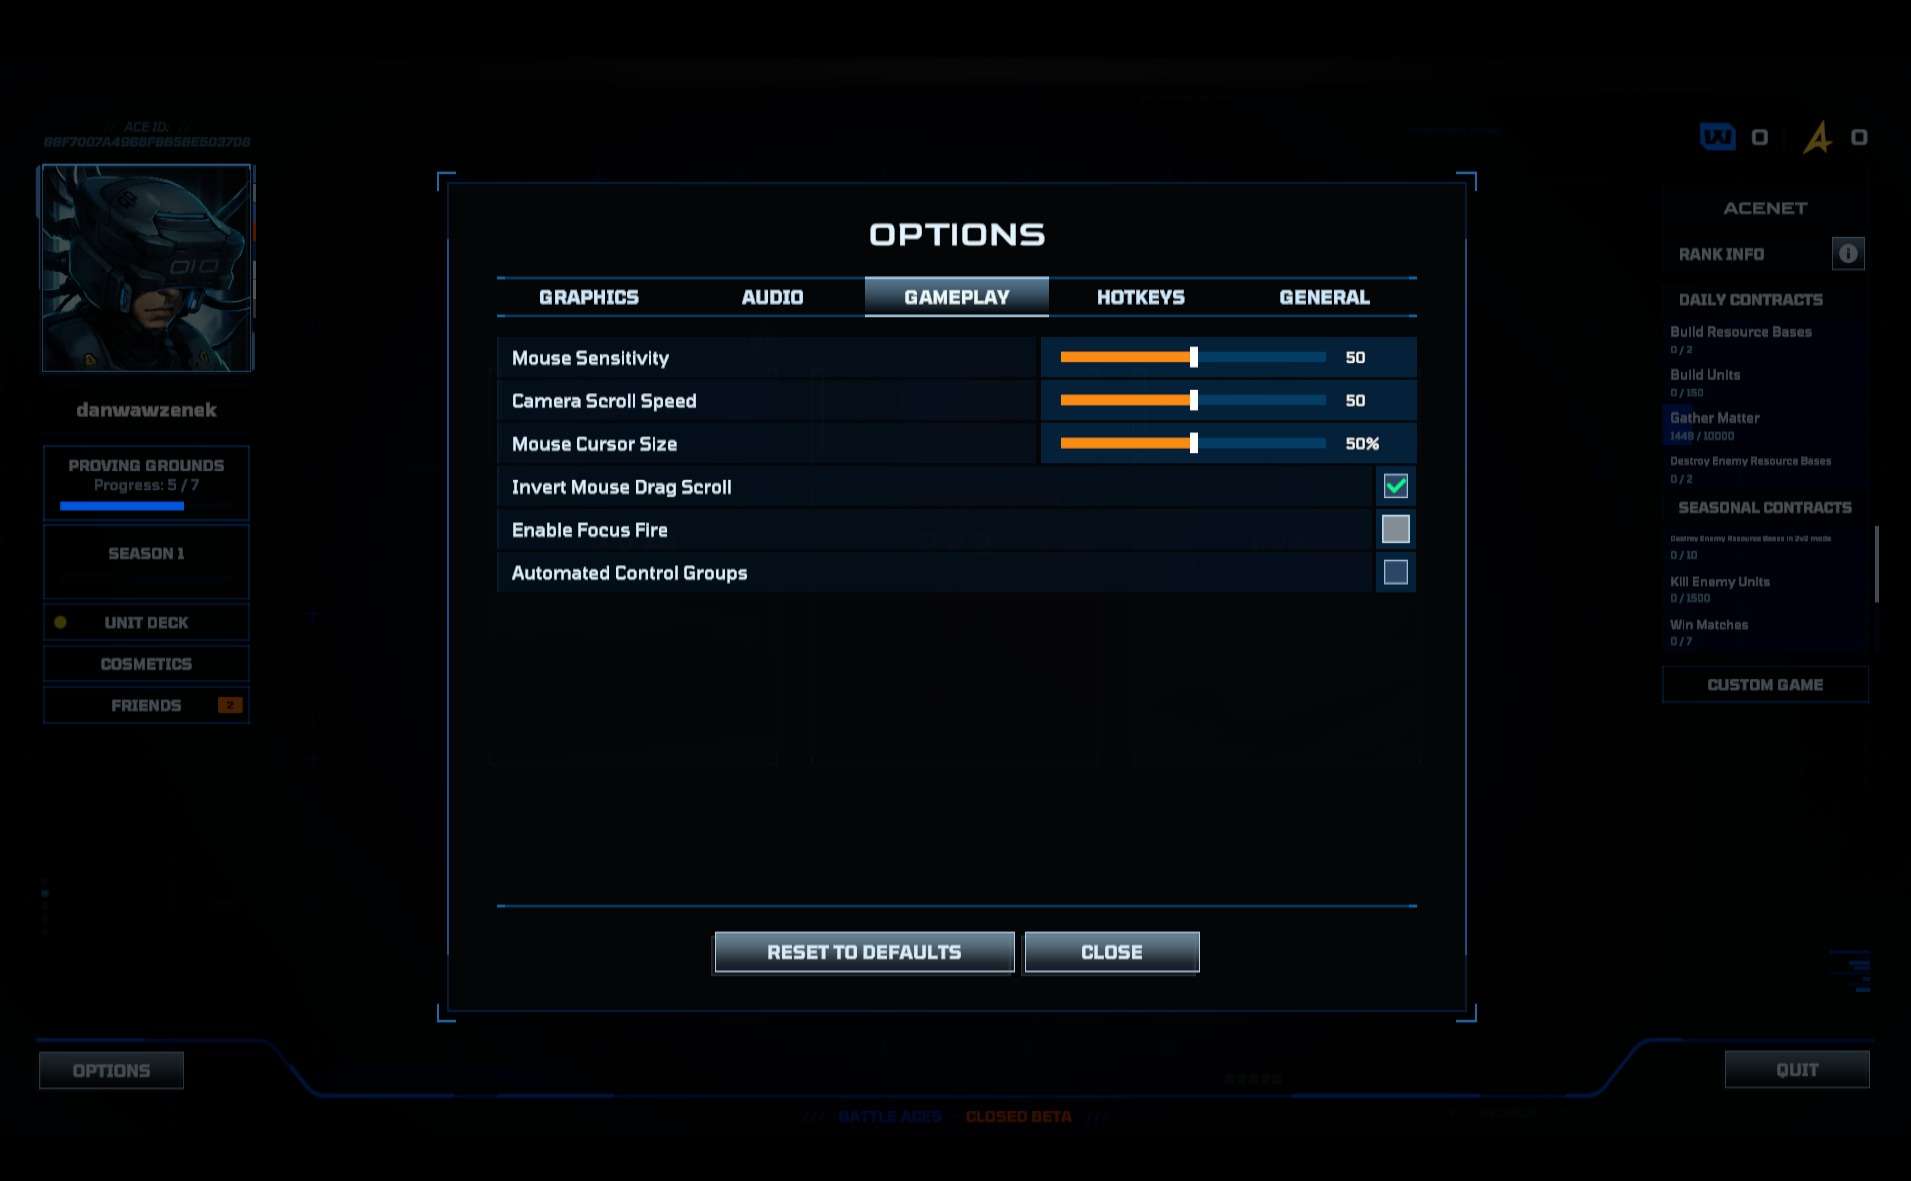
- Automated Control Groups – When enabled, the user will automatically add all newly built units (excluding turrets) into Control Group 1.
- Hotkeys – Options to customize your keybindings
- General – Options to replay the Opening Cinematic or to replay the tutorial.
Default Graphics settings will be set through the autodetect feature. Depending on your hardware configuration, you may want to adjust these settings for that optimal gameplay experience! Settings can be changed during a match, but some options, such as Rendering Quality, will require a reset for the changes to take effect.