Omniheroes – Clash Domain Guide
Quick Guide to Clash Domain
This guide has two main sections. The first section is just an introduction to the Clash Domain. It has information that I would expect people to know. I have put headings to categorize them; if you think you are familiar with that part, then there is no point in reading them.
I made this for literally everyone; therefore, I couldn’t overlook a small number of people that wouldn’t know all this. Anyway, the second section is pretty much the information that is not written in the game itself. Some of that information might be very obvious, but just because it is not mentioned in the game, I have included it.
Section #1
Map
Click to enlarge…
Basics
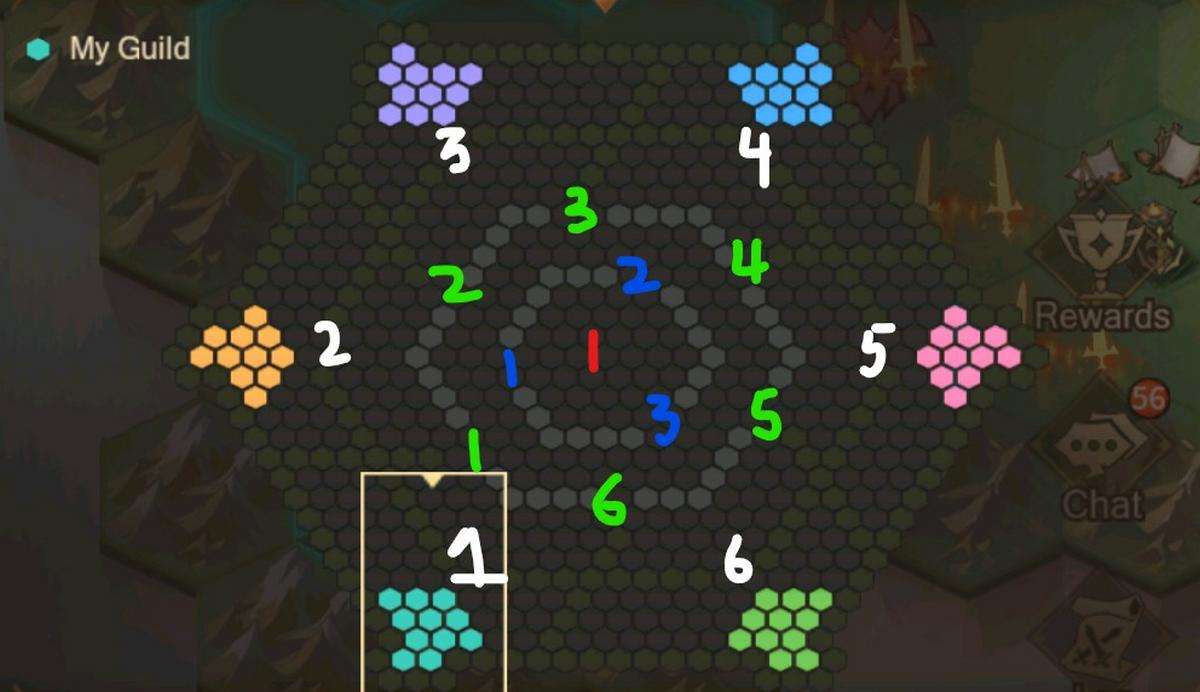
This text will use the above image for explanation because you cannot zoom in and out on the actual map. Hopefully, you will be able to relate this map with the actual one.
The whole map is a hexagon with 6 guilds, 1 at each corner. The map is composed of smaller grids. There are 2 main types of grids.
- Occupiable grids – those dark brownish grids. On the map these can be a variety of things like monster, outpost, fortress or just an empty grid.
- Non-occupiable grids – The dull green color grids. On the map these are the mountains.
Note: The grey grids are thorn barriers which block the path. They will disappear once the surrounding fortress is occupied. However, it is not certain at this point whether guilds can occupy them or not.
You can probably see that there are 4 layers for the edge to the centre. Moving our way from outside to inside, the first layer is accessible from Round 1, the second layer is accessible from round 5, the third layer is accessible from round 11, the fourth layer is available from round 16.
Confused about ‘rounds’. Dont worry it is explained later.
Buildings
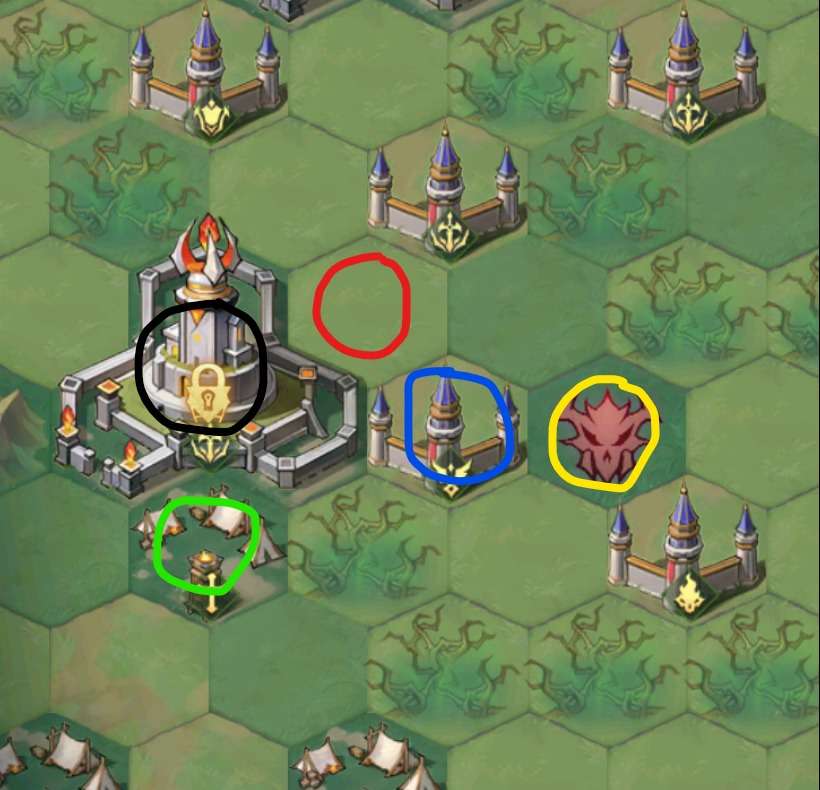
There are 5 different types of buildings. Two of them are actually not buildings but we are tossing them in this section anyway. These are all found on occupiable grids.
- Empty grid – denoted by red circle in the image. pretty self explanatory. If they are not occupied by a guild, they will always have 3 defenders, anywhere on the map. And the defenders are same. Upon occupation, they will grant 100 grid points per round to the occupying guild. You cannot get more points by blessings from these grids.
- Monster grid – Denoted by yellow circle in image. This grid appears with a monster icon. Consider them as a bounty. They become a normal grid after occupation but clearing them will give 900 grid points to your guild (only one time). You cannot gain more point by having a blessing. How many defenders will be there depends on their location: 1st layer – 8 defenders, 2nd layer – 12 defenders, 3rd layer – 16 defenders.
- Camp – Denoted by green circle in the image. In the game, it is actually called an outpost but we are calling it a camp for convenience. If unoccupied, It always has 8 defenders. They also have a random synergy which is Avengers in the image. They will grant 300 points per round but if you have the corresponding blessing activated you can get 100% more, so 600 points per round. S1-avengers synergy will also get a boost when sent to this grid (the specifics of the boost is not mentioned in the game).
- Outpost – Denoted by blue circle in the image. If unoccupied, it always has 16 defenders. Similar to camp, they will have a random synergy as well. They will give 500 grid points per round or 1000 with blessing.
- Fortress – Denoted by black circle in the image above. There are 4 different types of them.
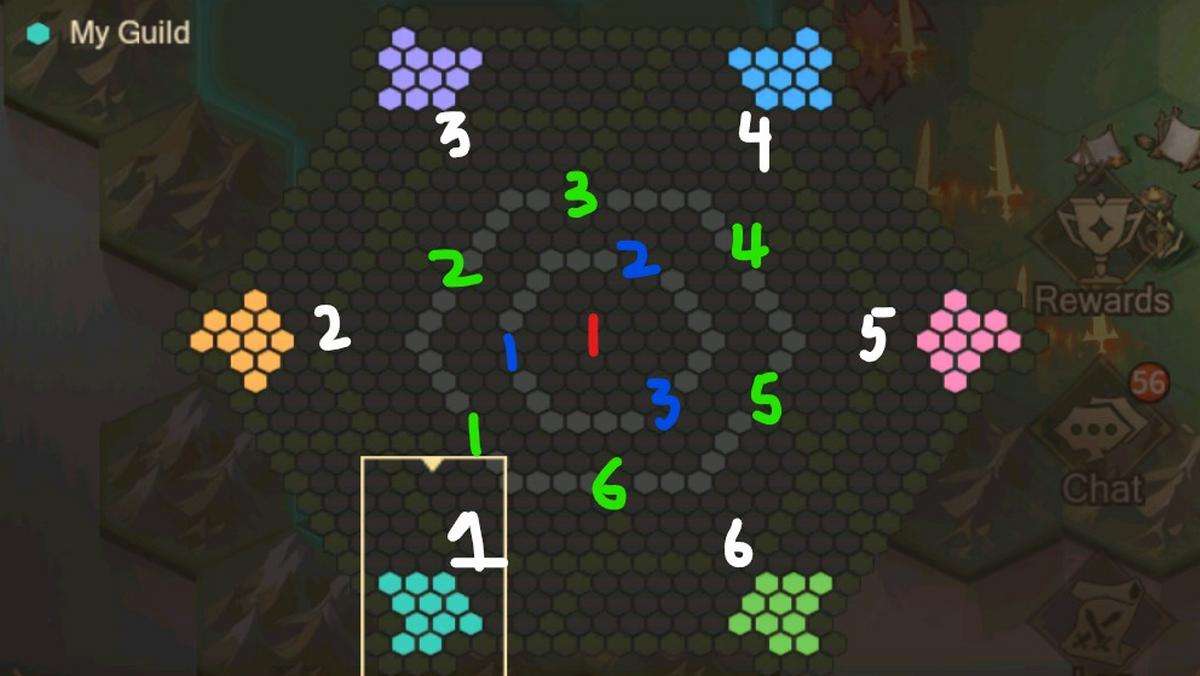
In this image, I have numbered and marked them with colors:
- White Color – Outer Fortress
- Green Color – Middle Fortress
- Blue Color – Inner Fortress
- Red Color – Central Fortress
There are 6 outer and middle fortresses. 3 Inner fortresses and 1 central fortress.
Outer, middle and inner fortresses have a random synergy and give the same, 1000 points per round. However, outer fortress has 25 defenders, middle has 40 and inner has 70.
The central fortress 80 defenders and will yield 2000 points per round. It also will have a random synergy.
The fortresses are locked and will unlock at certain rounds. You can check it by clicking on the timer.
Rounds
This information is also in the game, so if you are familiar with it, I suggest you skip.
There will be 4 clash domains in Season 1. Each of them will go for 14 days. The first day is preparation day where 6 guilds will be matched in a room. Round 1 kicks of on day 2. There are 13 days remaining and there will be 26 rounds, 2 rounds per day. In each round there are two phases.
- Action phase – This is the longer phase which goes for 11.5 hours. In this phase players can send their teams to grids. Administrators of a guild (leader, captain and general) can move around the teams and manage them. If another guild is attacking your guilds grid then you can also send defender teams to that grid in this phase.
- Settlement phase – This goes for 30 minutes. There will be an automatic fight between attackers and defenders on a grid. If attackers win, they will occupy the grid and gain grid points.
Grid Points
Grid points are just points that your guild can obtain. It determines the ranking of the guilds in the room.
I think thats all for the basic informations. The section below will go through the different buttons that appears at the bottom and right when you are on clash domain interface.
- Rewards – This shows the rewards for the clash domain that is undergoing. In here you can see two pages, personal and guild. Personal reward is based on your guild rank (determined by grid points) and your personal rank (determined by your contribution) in the guild. There are 3 brackets of personal ranking. You can see the rewards in the game. Guild reward is just tier points which will increase your guild’s tier. This is important as you will get weekly rewards and season rewards based on your guild’s tier.
- Log – there are 3 pages here. Personal contribution page basically shows you all the contribution points that you have gained in a specific round, you can change the round at the top. Personal report page is similar to battle report in arena or ygg, it will show you the battle replays. Now, just sending your team to a grid does not guarantee that you will take part in battle so, if you didnt take part in battle then you will see nothing. Guild record page is a bit more crowded but here basically you can see who battled in a specific round and how many wins they got, how many grid points your guild got in that round etc.
- Dispatch all – This will automatically send all your teams on random grids. FOR MANAGERS: If you use this button, then not only your team but all the teams will be randomly allocated to the grids.
- Bless – This is where you can use blessing stones to activate a blessing for a certain synergy. Upon activation, buildings with that synergy will yield 100% more points. In the records, you can also see who activated a blessing in your guild.
- Quests – this is just like normal activity quest. You get rewards for completing certain task.
- Edit teams – Here you can edit all your 6 teams, look where they are on the map, enable/disable auto mode etc.
- Manage – This is only available to guild leader, captains and general. A super useful interface for them. They can see all the teams from the entire guild alongwith their locations, power etc.
Section #2
Movement
The movement and availability of grids is similar to labyrinth. You cannot cross mountains, you can only access adjacent grids, though once you occupy them you can send your teams to any of those grids to defend, dont need to be adjacent.
How the Battling Works?
Sending your teams to a certain grid should be second nature now. What if there are 20 attackers but only 3 defenders? This is very important: in one particular round, one team (not a player, a team) can only win 3 times. If it wins 3 times then that team will be on standby and can be used in the next round.
Which of the attacker team fights the defenders? The battling will be in order. The top or first team that appears in attacker side is going to battle the first defender team, if won, then second defender team, if won, then third. If lost then the second attacker team will battle the enemy team.
Not sure: The 3 win limit only applies to actual player teams not AI teams, it doesnt matter whether the player team is attacking or defending.
So, what all this means is that if there are 25 defenders, you need at least 7 attackers, if you know you are going to win. If you are not sure about your win, then allocate more attackers.
For Managers: This one is for managers (leader, captains and general). You can move around your ally teams on a grid and choose which team you want to put at first, second and so on. This is a way to strategise and also a way to give a battle opportunity to everyone in the guild. If you want to keep your members happy, there are certain tasks in the quest which require battling, so help every member to get at least 400 quest point to get all the rewards.
For Members: If you communicate with your leader/captains then, it is better to keep your teams on auto mode. It allows them to move around your teams. Otherwise, if you want a battling chance, you will have to be the first person to allocate team on a grid.
Updated: Upon closer observation and facing actual enemy teams, the battling seems to be continuous. What this means is if your team 1 wins its first battle against enemy team but you lost 2 heroes in that battle then in the second battle your team 1 will start with 2 less heroes.
Blessings
Did you activate a blessing? If yes, you can see that you can activate another one on the same synergy. If you activate another, would you get another slot and does the effect stack?
Well, nope. You wont get another slot and neither the effects will stack. Instead, the blessing counter underneath your guild name will increase. The blessings for each synergy has 6 slots one for each guild. However, activating more blessings on the same synergy can still be beneficial because activating more blessings will level up your guilds blessing level. At level 1, it will increase the occupied grids grid point by 2%. So if there is 100 points on an empty grid, after that it will be 102 points.
Updated: Any synergy blessing is only active for only one guild at a time. The guild who is at Slot 1 will obtain the certain synergy blessing. The guild with the highest blessing activation for certain synergy will be at slot. For example, if your guild has 2 activations for valiantors and enemy guild has 3 then, enemy guild will be at slot 1 of valiantor blessing.
Points
There are two main types of points in Clash Domain.
- Guild grid points – these are obtained as your guild occupies grids and buildings.
- Personal contribution points – this will rank you in your own guild. Kind of like the damage ranking in greyshroom. There are 3 ways to get it. (1) Participation – Your team gets 1 point each round for participation. This is different from battling, even if your team dont participate in the battle, you will still gain 1 point just for sending your team to a grid. Maximum of 6 points per round can be obtained. (2) Activating a blessing will give you 20 points. (3) Take part in battle – If your team wins against defender team on a grid in settlement phase of round then you will gain 5 points per battle.
- Updated: If your team wins against a team from enemy guilds then you get 10 points. If your team lost against a defender you get 3 points.
I couldn’t restrain myself from writing this but for those of you who haven’t yet edited their teams, go do it. As clash domain kicked off on 12 January, you are automatically assigned 6 teams with random heroes here and there which doesn’t make any sense. You will have a hard time if you dont edit them.
My personal recommendation is going primarily for 1 synergy type per team. Alternatively, you can go with your best 2-3 teams and the others can be just placeholders which will work just as good. You dont need 6 good teams.